• Home
  • Mochi Magic Cook Book
  • About Us
  • Flavor Consulting
  • Book a Mochi Class
  • Order Mochi
  • Contact Us
  Kaori's Kitchen

class Recipes

Okonomiyaki

3/13/2017

2 Comments

 
Okonomiyaki​

Ingredients:
Serves 1

1 cup chopped cabbage
1 scallion, thinly sliced
1 tablespoon katsuobushi (dried bonito flakes)
1/2 cup all-purpose flour
1 large egg
1/4 cup cold water
2 slices bacon

Optional Toppings:
  • Katsuobushi (dried, shaved bonito flakes)
  • Aonori (Green and dried nori seaweed)
  • Japanese “Kewpie” Mayonnaise
  • Okonomiyaki Sauce (comparable to Bull Dog sauce)
  • Benishoga (pickled red ginger)
Method:
  • Remove the stem and tough parts of the cabbage and shred the rest.
  • In a large bowl, combine the shredded cabbage, scallions, katsuobushi, and all-purpose flour and toss to evenly distribute.
  • Add the eggs and mix together until all is incorporated.
  • Lay out three pieces of bacon in a pan, overlapping to account for shrinkage.
  • Add ¼ of the cabbage mixture and put directly on top of the bacon. Press down on the mound with a spatula to flatten on the topand then push the edges back toward the center to make a round pancake that is about ¾ inch thick.
  • Cover with a lid and cook for 7 minutes until the bottom of the pancake is well browned.
  • Flip the okonomiyaki and cook uncovered for another 7 minutes. Slide okonomiyaki out of the pan and onto a plate, cover with Mayonnaise and Okonomiyaki sauce, sprinkling the Aonori, Katsuobushi flakes, and red ginger on top. Enjoy!
Okonomiyaki Sauce -mix all together. (makes 1.5 cup):

Ingredients:
  • 12 Tbsp. ketchup
  • 10.5 Tbsp. Worcestershire sauce
  • 6 Tbsp. oyster sauce
  • 4.5 Tbsp. sugar
2 Comments

Japanese Miso Ramen Recipe

3/13/2017

3 Comments

 
Kaori's Kitchen Ramen Class Recipes

**You may need to buy a digital scale, as many ingredients are in ounces or grams

Ramen Noodles


  • 1 cup flour (bread flour yields an even chewier noodle, but all purpose also works fine)
  • 1 egg
  • 1 tablespoon kansui potassium carbonate solution (can be found in any Chinese store)
  • 1 tsp water


Instructions:


  • Put flour in a bowl and make a well in the middle of the flour
  • Crack the egg into the well, and add the tablespoon of kansui into the well. Break egg yolk with a fork, and then start stirring the flour into the center of the egg and liquid.
  • When dough starts to become shaggy, use hands to knead the dough until smooth in texture and in consistency
  • Roll out dough with a pasta maker or rolling pin to desired thinness, and cut with a manual pasta cutter or fold dough into thirds and cut with a knife.
  • Bring water to a rolling boil and cook for 2 minutes on high heat. Drain noodles and place in ramen. Enjoy!


Tonkotsu Broth (enough for 15 bowls)


Ingredients:
  • 1 large carrot
  • 1 sheet of kombu
  • 5 lbs pork bones (pork back, pork trotters, any kind of pork bone)
  • 5 oz ginger, sliced
  • 5 oz whole garlic
  • 1 bunch green onion
  • 1 onion
Instructions:

  • Prepare two pots of hot water.
  • Put all bones in a pot of water, bring to a rolling boil and boil on high heat for 10 minutes. Give thhe bones an occassional stir so that more foam can come out.
  • Dump out bones into a strainer, and wash each bone by hand under sink water.
  • Put bones into fresh pot of water and bring to a boil. Skim away any additional foam for a few minutes. Add in all of the other ingredients and make sure it is at a rolling boil for 8 hours (should be on high or medium high). Make sure to refill the pot with water to it's original level. 2 hours before the stock is done, there is no need to refill it. Just let it boil until the 2 hours is up. Placing a lid on top helps to reduce energy costs.


Spicy Miso Paste for Miso Ramen (enough for 15 bowls)
(you will need a digital scale for this)


Ingredients:
  • Mild Miso Paste, 357 g
  • Tobanjan, 172 g
  • Sugar, 109.5 g
  • Sesame Oil, 96 g
  • Soy Sauce, 36 g
  • Mirin, 15 g
  • Sake, 18 g
  • Grated ginger, 15 g
  • Grated garlic, 20 g
Instructions:
  • Mix all ingredients together, cover with a lid, and cook on low for 20 minutes on stove, stirring from time to time. Store in container. Keeps for a week, and can also be frozen!
  • To make 1 Serving of the Miso Ramen: Place 1 heaping tablespoon of spicy miso paste for every 2 medium-size ladles of soup. Adjust to taste.


Toppings

Chashu Pork
(recipe by Nami)

Ingredients

  • ¾ lb. pork belly or pork shoulder block
  • 1 tsp. salt
  • ½ Tbsp. oil
  • 2 inch ginger, sliced
  • 1 green onion stalk
Seasonings
  • ⅔ cup water
  • ⅓ cup sake
  • ⅓ cup soy sauce
  • 3 Tbsp. sugar
Instructions:
1. Peel and cut ginger into rough quarters. Save for later.

2. Sprinkle and rub the salt on the pork shoulder piece. Roll it into a log with butcher’s twine, keeping the thick fat on the outside. Start tying from the center of the log toward left and right.
3. Heat the oil in a cast iron skillet (or regular frying pan) over high heat and brown the fat side first, then flip over to brown the other side. It’ll take about 10 minutes.
4. While browning, put all the ingredients for seasonings in a heavy-bottom pot (or regular pot).


  1. Place the pork shoulder in the pot and add ginger and negi and bring it to a boil. After coming to a boil, place a secure lid on top of the pot and turn to medium heat.
  2. Continue to cook with the lid on for 1.5 hours.
  3. Take out the pork shoulder carefully and place in fridge or freezer for 2 or more hours. This will help the pork to firm up so that you can cut it into nice semi-thin (¼ inch or ½ inch) slices. You can cut it while hot too but it may break apart so I recommend some cooling time
  4. This is an optional step, but use a propane torch or broiler to sear each slice of pork belly to enhance the flavor. Enjoy!!
Shoyu Tamago (Soft-Boiled Eggs):

Ingredients:
  • 5 eggs (enough for 10 bowls of ramen, since eggs will be cut in half). You can add in more, too!
  • Water for cooking eggs
Method:

  1. In a small pot, heat up water to a rolling boil.
  2. Place the eggs in the water gently, with a spoon to prevent cracking. Eggs should be fully submerged and water should be boiling when eggs go in, so be careful not to crack the eggs by dropping them into the pot. Immediately set a timer for 6 minutes.
  3. Meanwhile, prepare an ice bath for the eggs (ice cubes and water). After 6 minutes are up, immediately put the eggs into the ice bath to stop the cooking process.
  4. Wait 5 minutes, crack eggs lightly on the counter, then peel shell off of the eggs very carefully, as the egg is still soft on the inside
  5. Mix together a solution of 25% soy sauce to 75% water. Put eggs into this solution. Eggs must be fully submerged.
  6. Marinate for 3 days. They can be eaten earlier than 3 days, but 3 days is best.


Optional Toppings:
  • Soft-boiled eggs, cut in half
  • Thinly-sliced green onion
  • Japanese fishcake (called “Naruto-maki”)
  • Seasoned Japanese Bamboo Shoots, called “Menma”
  • Sliced, cooked shiitake mushrooms
  • Nori, dried Japanese seaweed sheets (like the ones used to make sushi rolls)


3 Comments

Gyoza Dumplings and Miso Soup

3/13/2017

3 Comments

 
Japanese Gyoza Dumplings Recipe


Gyoza Dumpling Ingredients:


  • 1 small-sized napa cabbage
  • 1 pound ground turkey (or ground chicken, beef, shrimp, pork, etc..)
  • 1 package wonton wrappers
  • 4 green onions
  • 1 tablespoon minced garlic
  • 1 tablespoon minced ginger
  • salt and pepper, 1/2 tsp each


Dipping sauce:


  • mix 1/4 cup rice wine vinegar with 1/4 cup soy sauce


Instructions:


1. Finely mince the cabbage, garlic, and ginger, and mix together in bowl. Mix together with salt and pepper.


2. Fill and fold the wonton wrappers with the filling.


3. Add 1 teapsoon oil to a frying pan and fry the dumplings for 2 minutes on medium high.


Add 1/2 cup water to pan, cover with a lid and cook for about 4 more minutes on high heat. Remove from pan and enjoy!


Miso Soup (serves 3-4)​

  • 3 cups water or homemade dashi (dashi is made by soaking a handful of dried shiitake mushrooms in water, and using that water for the soup)
  • 3 Tbsp. miso (I use mild miso, called “awase” or white miso)
  • 6 oz regular or silken tofu
  • 2 tsp. dried ready-to-use wakame (wakame is seaweed; this is optional)
  • 1 green onion/scallion (sliced finely)
  • ½ pack of enoki mushrooms (optional; chop off stems and wash)
  • 1 piece fried tofu skin (called “aburrage”), sliced into ½ inch strips


For quick dashi (instead of homemade dashi)
  • 3 cups water
  • 1 dashi packet or 1¼ tsp. dashi powder
    ***If you don't have homemade dashi or quick dashi ingredients, just use water, it'll still taste good! :). Dashi is umami-infused water! Creates a deeper flavor for the soup, but I would say not entirely necessary.

Instructions:
  1. In a medium saucepan, add 3 cups or more of water/homemade dashi. You can add more water if it is for a bigger party, and add miso to taste.


  2. Bring water or dashi to a boil over medium high heat. After it reaches boiling, reduce the heat to medium low and simmer.


  3. Finely slice the green onion and put the dried wakame (optional) and green onion in each bowl.


  4. Put 1 Tbsp. of miso in a ladle (or strainer) and blend it with water/dashi until it is thoroughly mixed. Continue this process until miso is all used. Usually each cup of dashi, you will need about 1 Tbsp. of miso. If you add tofu in your miso soup, tofu dilutes the soup a little bit so you might want to add ½ Tbsp. more miso.


  5. Cut tofu into ½ cm cubes and add to the soup. Stir gently without breaking the tofu. Add in the enoki mushrooms and fried tofu skin (both optional) and cook for 4 minutes on a light simmer, until mushrooms are translucent and cooked.


  6. Return the miso soup to a slight simmer until heated through and pour into the bowls. Be careful not to boil the miso soup because miso will lose flavor.

    *If you don't have dashi packet or powder, see how to make homemade dashi stock.

    *Each brand or kind of miso has different level of saltiness; therefore, add miso 1 Tbsp. at a time and taste the soup before you add more miso.

3 Comments

Sushi Rice

3/13/2017

1 Comment

 
(makes 6-8 rolls, serves 4)
 
 Recipe courtesy of Mark Matsumoto
 
Sushi rice, or sushi meshi is short-grain rice seasoned with vinegar, sugar and salt.
 
 Ingredients:

  • 3 cups rice (Please use Japanese short grain rice for making sushi)
  • 3 ¼ cups cold water
  • ½ cup rice vinegar
  • 2 tablespoons granulated sugar
  • 2 teaspoons salt
 
OR, the easier way:

  • 3 cups rice
  • 3 ¼ cups cold water
  • ½ cup sushi seasoning


Instructions
  1. Pour all rice grains into a bowl and wash with water. Use your hands to remove the excess starch off each grain of rice by using a gentle rubbing motion. If you scrub too hard you will break the rice, so don't be too rough. Drain and repeat 3-4 times.
  2. When the water that runs off is mostly clear, drain the rice.
  3. If you're using a rice cooker, add the rice to the bowl of the rice cooker and add the cold water. If you don't have a rice cooker, add the rice to a large heavy bottomed non-stick pot, then add the water (3 ¼ cups)
  4. Let the rice sit in the water for at least 30 minutes. This allows the grains of rice to soak up some water before cooking, which results in shinier rice with a better texture.
  5. If you are using a rice cooker, turn it on and let it do it's thing. If you are doing this on the stove, turn the heat onto high and bring the rice to a boil (be careful not to let it boil over). Turn down the heat to low and cover with a lid. Set a timer for 15 minutes. Once the rice is done, turn off the heat and let the rice steam for 10 minutes.
  6. While you wait for the rice to cook, combine the vinegar, sugar and salt in a small bowl. You can microwave or heat on stove for a bit to help dissolve the sugar.
  7. After the rice has had a chance to steam, it should be firm, but the core should not be crunchy. It should be sticky, but each grain of rice should retain its own shape. If your rice was fresh, the surface of each grain should be glossy.
  8. Dump the rice out into a very large bowl, the key is that you want a container with a lot of surface area so you can spread the rice out. Pour the vinegar mixture (or sushi seasoning) evenly over the hot rice.
  9. Set the bowl on a damp towel to keep it from sliding. Using a broad flat wooden spoon in one hand, gently combine the rice and vinegar mixture using a side-to-side cutting motion, and folding motion with the edge of the spoon. You want to separate each grain of rice, so the vinegar penetrates every surface, but you don't want to break the grains of rice or mash them together.
  10. The rice is done when the surface is no longer wet and slippery, the rice is fluffy, and each grain is very shiny. It will still be a little warm, but it should not be hot. Spread the rice out over the surface of your bowl, and cover with a damp towel until you're ready to use it.
 
Reminder of Sushi Rolling Process:
Picture
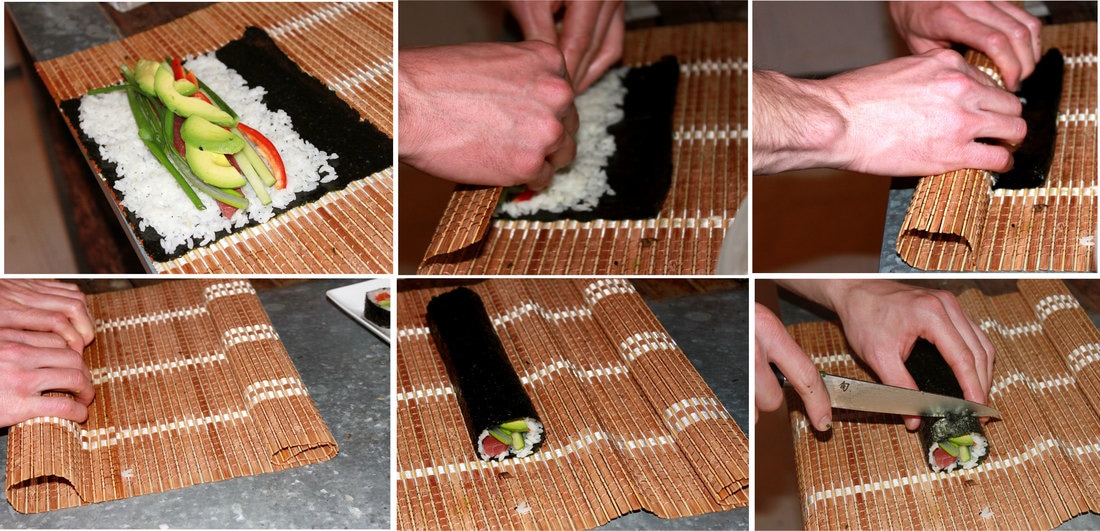
Other Sushi Supplies:
  • Fresh salmon and tuna can be purchased from a local Japanese store (i.e. Tensuke on Kenny Road)
  • Avocadoes: Buy avocadoes and let them ripen several days in advance before your sushi party
  • Crunch Roll: The crunchy tempura bits can be bought from Tensuke or other Japanese specialty stores. Or, the bits can be made after making your own sweet potato tempura.
  • Cucumbers: Buy English cucumbers as they are more crispy, have less seeds, and are more suited for rolls
  • Imitation crab meat (enough for 4 rolls): Finely chop 7 imitation crab sticks to 3 tablespoons of Japanese kewpie mayo (or regular mayo), and mix.
  • Sesame Seeds
  • Sushi Mat (plastic is better, so that the rice doesn’t stick. Rice will stick to wooden mats, so make sure to wrap those with plastic wrap).
1 Comment

Japanese Rice Balls

3/13/2017

1 Comment

 
​Ingredients:
 
  • Cooked Japanese rice [We do not use vinegared sushi rice!] (2 rice cooker measuring cups (360ml) of uncooked rice)
  • Water
  • Salt
  • A few sheets of nori (seaweed)
  • Fillings (Anything you like to put)
  • Salted salmon Umeboshi (Japanese salty pickled plum)
  • Katsuobushi (bonito flakes)
  • Soy sauce
 
Things you need:
Wet towel to wipe your hands
Bowl of water
 
Instructions
  1. While rice is being cooked (see How To Make Rice), prepare the fillings.
  2. Bake salted salmon at 400F degree in a toaster oven for 25 minutes and break the cooked salmon into flakes.
  3. Pit umeboshi and cut it in half (optional)
  4. Moisten katsuobushi with soy sauce.
  5. Let the cooked rice cool a little bit until you can hold rice without burning your hands. However, do not let the rice completely cool down.
  6. First wet both of your hands with water in order to keep the rice from sticking to your hands.
  7. Then put some salt in your hands and rub to spread all around.
  8. Scoop out a handful of warm rice (about ½ cup) into one hand.
  9. Using the other hand, make an indentation in the rice.
  10. Place one kind of filling (about 1 tsp.) inside.
  11. Press the filling into the rice.
  12. Then use your hands to mold and press the rice around the filling to gently form the rice into a triangle.
  13. Form the bottom with your left hand and the top corner with your right hand. I use three fingers (thumb, index finger, middle finger) to cover the area to make a nice triangle shape. Pressing the triangle into the palm of your left hand, squeeze each corner of the triangle with your right hand. Your hands should be just firm enough so the onigiri doesn't fall apart. You don't want to squeeze the rice too tight.
  14. Also, while you squeeze onigiri firmly with both hands, your left hand has to press onigiri in order to keep a nice form. The left photo shows before squeezing and right photo shows after.
  15. Place a little bit of each filling on top of onigiri so we know which kind it is. Before you serve, wrap the onigiri
 
1 Comment
    Picture

    Hey there!  
    Welcome to
    ​Kaori's Kitchen :)

      Subscribe to be in the know!

    Subscribe to Newsletter
    Picture

    Categories

    All
    Japanese Recipes
    Korean Recipes
    Thai Recipes

    RSS Feed

Picture

© Kaori's Kitchen, Inc., All rights reserved

Contact us:

​info@kaoriskitchen.com

Proudly powered by Weebly
  • Home
  • Mochi Magic Cook Book
  • About Us
  • Flavor Consulting
  • Book a Mochi Class
  • Order Mochi
  • Contact Us